Showing posts with label installation. Show all posts

Tuesday, June 16, 2015

5 Steps to Successfully Applying Penetrating Sealer to Cement Tile


Sealers for cement tile should be applied to protect the tile from water and staining; but, they can also be used to enhance or restore color. A color-enhancing sealer was used on this exterior cement tile walk, stair risers, and treads to protect them and brighten the colors.

Color enhancing impregnating sealers are used to brighten cement tile color
Color-enhancing impregnating sealers are used to brighten cement tile colors,
especially exterior tiles subject to fading from the sun.

Sealers remain one of the most misunderstood and confusing steps of installing cement tile. The confusion comes from the different types of sealers (impregnating, topical, color enhancing), the nomenclature used (impregnating is the same as penetrating), and the dizzying number of manufacturers and specialized products offered.

With so many sealer options available, including finishing effects (gloss, satin, matte) and applications (outside sidewalk, inside bath, or pool sideboard), you are sure to get a different procedure from different people each time you ask. So, it's easy to understand why people get confused. It doesn't have to be confusing though. The goal of today's post and short video is to demystify the use of sealers when it comes to installing cement tile,

Step #1. Select a high-quality penetrating or impregnating sealer. You may use either a water-based or solvent-based sealer. Water-based sealers are slightly easier to apply and may provide better coverage protection because they aren't as deeply absorbed into the tile. Solvent-based sealers have a strong odor when applied and may provide longer protection, especially against water. I explain this thoroughly in a previous post, Sealing Cement Tile.

When selecting a sealer, make sure it's rated for where you are using the tile. Specifically ask if the sealer can be used for:
  1. Indoor or outdoor applications
  2. Floor or wall applications
  3. Wet locations (pool or bath) or dry location (bedroom)
Step #2. Select a topical sealer if you want to provide additional finish effects to the tile. Penetrating sealers usually do not effect the finish of the tile because they work by impregnating the tile below the surface. Topical sealers create a barrier on the surface of the tile so that stains do not reach the cement. Topical sealers have different finishes that include shiny, satin and matte. Often, matte topical sealers are produced by adding a chemical that cuts the shine, but also weakens the sealer. Topical sealers are not generally recommended for exterior applications as radiant energy from the sun deteriorates them quickly. Topical sealers will wear over time and generally need to be reapplied more frequently that penetrating sealers.

Color-enhancing penetrating sealers can be used to enhance (brighten or darken) the colors of the cement tile. This is a good choice for exterior applications that are subject to fading from the sun.

Step #3. Test your sealer/sealer combination. Always test the final choice of your sealer or sealer combination. Simply apply to a test tile and make sure the desired finish is achieved without any adverse reactions.

Step #4. Clean the area to be sealed. Make sure the tiles to be sealed have been cleaned, all grout has been removed and the tiles are thoroughly dry. Start with a physical cleaning with a blower or broom. Then clean with a tile cleaner or mild detergent and rinse with water and a grout sponge. If the tile looks hazy or cloudy, clean again.

Step #5. Apply the sealer. Use a lamb's wool applicator, lint-free rag or paint brush. Generally, you'll want to apply three coats allowing the sealer to dry between each application. Make sure to apply generously; but, do not allow the sealer to pool, streak, or run.

Tile immediately after applying a color enhancing sealer. No pools or streaks in the sheen.
Tile immediately after applying a color-enhancing sealer. As you can see, there are no pools of sealer or streaks in the sheen.

Cement Tile Crazing
Cement tile often exhibit "crazing" or fine, hairline cracks over time. This is not a defect and does represent any problem with the tile; however, it will be more apparent when the tiles are wet or when applying a sealer. The small cracks or branches show more on dark tiles and plain tiles. Don't panic or think you've done something wrong if you see this after applying a sealer or if the tiles get wet.

Cement tile crazing can be seen in the plain red stair tread
Cement tile crazing can be seen in the plain red stair tread.


Small fissures or crazing is more apparent on dark colors and when the tile is wet
Small fissures, or crazing, are more apparent on dark colors and when the tile is wet.

How to Apply a Penetrating Sealer to Cement Tile Video
This short video shows how to apply a penetrating sealer to unsealed and previously sealed cement tiles. This important part of the installation process protects cement tile from water and staining. I show how easy it is to apply a color-enhancing impregnating or penetrating sealer to a tile walk and patio. I also recommend products to use and where to get them. You can see for yourself, just how easy it is to apply a sealer.


These five simple steps will ensure success for every cement tile project you do. If you aren't sure about which sealer to choose or if you should apply a grout release. We can help! These handy guides will give you all the information you need to know!


Tuesday, September 25, 2012

A tile shower installation- Time lapsed video/explanation

How to tile a shower in 48 seconds! Ah wouldn't that be nice but in reality it took a bit longer.
This will give you a great overview of the process though from sealing the cement board to wiping the tile clean.


Now for a bit of the explanations behind the process.

Here you can see the cement board and the coating is a waterproof membrane that is rolled on. It's a bit of extra security and peace of mind.

This pre-made shower niche was added by cutting into the cement board exactly where it would go and once that was done the edges were sealed with caulk to ensure against future leaks.


I had already planned out the tile layout so the next part was to actually start setting the tile.

Thin set and subway tile


As I worked my way up we then came to the layer of glass tile, which actually came in a sheet and which we cut in half for the bottom and top layers.
Glass tile in a shower

Then the addition pattern was set and the second layer of glass tile will be added above.

Tile pattern in a shower


Then the additional layers of tile are added, let to sit overnight and the grout is applied.

Tile installation complete for a shower

The grout is applied and then smoothed over as an initial cleanup with a damp sponge and allowed to sit again overnight. 
Applying grout


The final clean up with again a  damp sponge.
Tile clean up, damp sponging


The finished product!

That's the basics of tiling a shower and I do have to apologize for the yellow color in the photos. This was done as the project took place and not under showroom settings without professional lighting and such. Hopefully it will give you a good idea of what goes into tiling a bathroom shower and wouldn't it be nice if it could be really done in 48 seconds!


Tuesday, June 5, 2012

Spanish Tile as a Building Material


Ceramic tile use throughout Spain is prolific. Not only can it be seen on the floors and walls of Aragonese countryside homes, but ceramic tile also plays an integral role in the everyday functioning of many embellished palatial royal dwellings. It wasn’t until 2011 when I realized just how much of a role ceramic tile played, not only in the current day-to-day daily life of Spaniards, but the depth and complexity of historical value.


Spain ceramic tile historical handmade handpainted
The Basilica Nuestra Senora del Pilar, as viewed from across the Ebro river, features vibrant blue, green, yellow, white and ceramic tile on its main dome, as well as its 10 smaller domes.


Last year, along with four members of the architecture and design (A&D) community, I was asked to join the second edition Tile of Spain’s “Reign in Spain A&D Tour.” Tile of Spain is the umbrella brand managed jointly by the Trade Commission of Spain in Miami, FL, and the Spanish Ceramic Tile Manufacturer’s Association (ASCER) in Valencia, Spain. The annual media tour to Spain coincided with Cevisama, the International Ceramic Tile and Bath Furnishings Show held in Valencia. 


The group of architects, interior designers and journalists, including myself, traveled to the cities of Zaragoza, Teruel and Valencia – admiring the Spanish architecture, culture, and culinary temptations – with Cevisama being our final destination. 


Shortly after our arrival to Spain, we were taken to Zaragoza, the capital of the region of Aragon. Located on the banks of the Ebro River, halfway between Madrid and Barcelona, Zaragoza hosted Expo Zaragoza in 2008, where the country showcased its commitment to water conservation, the preservation of the environment and its utilization of sustainable practices. Of course, ceramic tile and terracotta played an integral role in all of this.


terracotta ceramic tile sustainable eco-friendly
The Spanish Pavilion on the grounds of the 2008 Water Expo features 750 terracotta pillars.


ceramic tile handmade exterior reflective energy efficient sustainable
The Conference Center of Aragon utilizes 120,000 triangular pieces of ceramic tile on the exterior walls and roof lines.


Walking through the Plaza de la Seo in Zaragoza, we came upon two basilicas, the Cathedral of San Salvador (La Leo) and Nuestra Senora del Pilar. Without a doubt, ceramic tile played both an aesthetic and architectural role in both of these historical structures. The blues, greens and yellows are as vibrant as when they were first applied to the brick exterior of La Leo and to the many baroque domes of Basilica del Pilar.


ceramic tile historic installation handmade hand-painted sustainable artistic
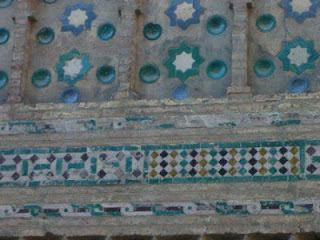
The tower wall of Basilica of San Salvador (La Leo) features various shapes, colors and sizes of ceramic tile.

ceramic tile historic installation handmade hand-painted sustainable artistic
A detailed view of the wall shows the vibrancy of the colors and painstaking detail of this installation. 


In my next post, I’ll focus on Teruel (a World Heritage city designated by UNESCO). As a center for Mudejar art, a style influenced by Islamic tradition and more contemporary European architectural styles, the fortress-like city is characterized by extensive use of brick and glazed tiles within its architecture. In the meantime, you can check out the beautiful hand-painted ceramic Spanish tiles offered by Avente Tile


Tuesday, May 29, 2012

Why grout cracks in tile installations

The most visible part of any tile installation is, of course, the tile but what is the next thing you see. The grout! The grout, in many ways, is more visible as the smaller lines that make that up can draw your attention away from the tile itself. If those grout lines have cracks or are crumbling, your eye will naturally shoot right to it.

So let's look at few things and how they should be handled to make sure that the grout you use compliments your beautiful tile. Do you know the difference between sanded and unsanded grout and where each should be used? Now the difference in the two is easy. One has sand, one doesn't.

Applying grout

Now where to use which one is determined, not by the tile itself, but rather by the width of the joint between them. 

"Narrow joints of 1/8 inch or less call for unsanded grout, a pudding-smooth blend of Portland cement and powdered pigments mixed with water. Joints wider than 1/8 inch get sanded grout — the same material, but with sand added. The sand helps bulk up the grout and keeps it from shrinking in the joints." - ThisOldhouse.com

Now why does grout crack? You've applied the proper grout but down the road cracks start to appear in your grout lines and there can be many reasons but most have to do with the installation long before the grout was added. Most of what we will look at today is in reference to flooring but there are many points that are similar with all tile installations.

1. The first potential reason is that the thinset below the tile was improperly applied and does not have enough thinset.

Thinset application on floor

2. The subfloor is moving and as it moves the grout lines crack.  Did you apply the tile directly to the wooden subfloor? Tile should never be applied to a wooden subfloor due to the natural movement that is part of wood.

3. Was the cementious backer board that was applied over the subfloor installed correctly? Maybe there weren't enough screws or thinset below or it was spaced improperly. Any of these could cause movement and that causes cracks.

Cementious backer board installed

4. As another possibility- Is there adequate space between your wall or wooden trim and your grout? Grout doesn't contract and expand but wood does and that could be part of the issue too. It is a good idea to leave a 1/4" space between any tile and wooden baseboards or trim so that if the wood expands, it will not apply pressure to the tile and possible crack the grout. To accomplish this a "shoe" molding can be applied to the baseboard, effectively covering the gap and allowing the baseboard to move above the tile while applying no force to the tile or grout.

5. Did you apply your tile on a newly finished/poured concrete slab? Concrete has to cure and as it does it moves, so if your concrete floor or base is new and the tile was applied too soon, it could be the reason your grout is cracking. 
I would also add there could be other reasons for grout to crack other than those listed above such as improper mixing  ie too much water in the mix. This would cause the grout to improperly dry leaving it prone to cracking later.  It could also be that water was added again later in the mixing process and this will cause the grout to be dry and crumbly.

Now if you are still in the planning stage I would offer a suggestion or rather a product and installation method that will help avoid the problem of movement and grout cracks. It's a mat that is laid in a bed of thinset and then a layer of thinset is applied above with the tile and grout.

Schluter- Ditra-X for floor tile installation

Schluter-DITRA-X


What this mat does is provide a separation between the sub flooring material, whether that be wood or concrete so that if there is movement in the concrete/wooden sub floor, it will not translate up into the tile and grout and cause cracking.The mat will take the added stress of the movement below and not the tile/ grout therefore helping to eliminate cracking. For further reading about this product-http://www.schluter.com/Schluter-DITRA-XL.aspx 


As we have pointed out before, planning ahead and armed with knowledge will lead to a successful installation as it is so much easier to do right the first time than have to go back and correct later.