Tuesday, September 24, 2013

Cement Tile Design Trends & Tips


I love the color in this cement tile floor. Notice how the cement tile pattern blends similar colors to create a simpler pattern?  If you're having trouble finding the right color, design or pattern, then these cement tile design trends may provide the answer you were looking for.

Traditional Sosua Cement Tile rug
Traditional Sosua Cement Tile installed as a rug

If you're new to cement tiles, then these trends are the perfect designing tips for you!

Tip #1: Strong patterns can be "softened" with the use of similar colors that help blend a design together.

Ornate, traditional cement tile patterns are finding their way into homes with  fewer colors
More ornate, traditional patterns are finding their way into homes with  fewer colors

Tip #2: Bold patterns can be softened with the use of muted colors.

Zebra cement tile pattern in B Colorway from Avente Tile
Patterns will be less commanding if you use muted colors like this customer did with our Zebra pattern in B Colorway.

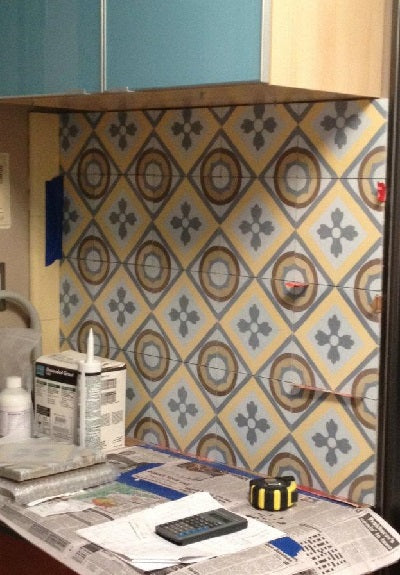
Tip #3: Geometric patterns using straightforward palettes with two or three colors are a great way to introduce cement tile and a bold splash of color into your home. It's also a strong design trend as homeowners, architects and designers consider cement tile for floors and kitchen or bathroom backsplash.

Trend: Geometric cement tile pattern
Cement Tile Design Trend: Geometric patterns using two to four colors

Cement Tile Color Trends

After returning from Coverings 2012I was so ecstatic about the use of color in the tile I saw that I couldn't wait to get home so I could blog about it (see Tile Trends from Coverings 2012). For the first time in a very long time, I saw the use of color and color tile on the show floor. I'm thrilled to report that the trend continues from what I saw recently during Coverings 2013. Despite an extensive palette of more than 80 colors, I'm finding there is a strong design sense to use grey tones in cement tiles. In fact, Avente just submitted samples of Dark Shadow, Ash Grey, Grey, and Pewter for a new restaurant that will require more than 1,000 square feet of tile! I guess this shouldn't come as a big surprise. Interior Designer and go-to color maven, Lisa M. Smith, recently explained, Black, White & Gray – The New Fall Interior Palette.


Subtle and complex grey tones are popular color choices for cement tile.

The other strong trend has been the increased use of steel blues or gray-blues. The rendering below shows the final design and colors of the cement tiles destined for a New York City hotel. 

Traditional Bruselas cement tile rendering with Steel Blue Colors

Tip #4: Use colors in the pattern that already exist in your home.  Avoid bringing in new colors just because you like them.

Cement Tile Takes Shape With Arabesque Designs

Cement tiles are not confined to just a rectangular format. Their strength and durability easily lend themselves to the geometric, Moorish-inspired Arabesque cement tile patterns. Customers gravitate to the natural red, brown, and terracotta bisque colors these tiles adroitly mimic. However, the gray colors from this palette are a popular choice, too. 

Tip #5: A different format or shape in just one or two colors will provide interest and subtle texture.


Arabesque Cement Tiles crafted in three colors


Have a Question? A tip you'd like to share?
Do you have a favorite cement tile tip or nagging question? Contact us or leave a comment. We'd love to hear from you!

Sign up to Receive our Free Monthly Newsletter
If you love tile, you'll enjoy Tile Talk. The newsletter provides information on specials, tile tips, design ideas, and new products. Don't delay! Sign up now to receive our free monthly newsletter via email.

Tuesday, September 17, 2013

Interview with Lilywork Artisan Tile, LLC

Today's post is the second in our Tile Artisans Interview Series. It’s a joy to share their love of tile. By getting to meet the artisan, you begin to discover both their techniques and inspirations. I met Esther of Lilywork Tile about eight years ago at Coverings, an annual tile and stone trade show. I was captivated by the unusual dance that her complex glazes played with unusual textures and classic patterns. Esther has a passion for tile and you’ll find that in every Lilywork Artisan Tile that is made. — Bill Buyok


Bosphorous/Rosette Focal by Lilywork Artisan Tile, LLC

1. How and when did you start creating your tiles?
Both Paul and Esther, owners of Lilywork, come from art backgrounds. Paul studied at the Tyler School of Art in Philadelphia. During this time, his mentor, Will Mead of Peace Valley Tile, introduced him to tile-making. It was here that Paul developed a passion for the craft that has been with him for the last 14 years. Paul had worked tirelessly to hone his craft, balancing his own business and, until recently, holding the position of Mold-maker at Moravian Pottery and Tile Works in Bucks County, PA. Esther, the other half of Lilywork, got her start at the Hartford Art School. Originally starting in printmaking and textiles, Esther quickly found her niche in tile-making. “I realized the layering of pattern, texture and color I wanted could best be achieved in the ceramic arts.”


Herringbone Backsplash by Lilywork Artisan Tile, LLC

2. As an artisan, what inspires your creations?
Lilywork owners gain inspiration from travels, pulling ideas from architecture and cultures across Europe and the Near East.


Ravenna Listello by Lilywork Artisan Tile, LLC

3. Now, of the many designs and projects, which stands out as your favorite? Why?
One of our favorite recently completed projects is a residential backsplash. It is a traditional space in a historic home using Lilywork field tile in the herringbone pattern. It also incorporates one of our more interesting textured field tiles, Bosphorous, and three-dimensional rosettes into the focal area. We were able to work more closely during the backsplash design process for this project.


Backsplash with 4" Field and Star+Cross Focal
by Lilywork Artisan Tile, LLC

4. What was the proudest moment for you and your hand-made tile business?
One year ago, this past April, we both began to work exclusively for our own company. It is something special to look back at what had been built from the ground up and now could sustain us, especially during a time when the economy was uncertain.


Concept 1 by Lilywork Artisan Tile, LLC

5. In promoting your creations, and to help gain greater exposure, which digital platforms do you use (Blogging, Facebook, Twitter, Pinterest, Instagram, etc.)? How do you use them to promote your hand-made tile business?
Facebook has been helpful for showing studio process shots. It is invaluable for designers, dealers and prospective clients to see and understand the hand-made process.


Concept 2 by Lilywork Artisan Tile, LLC


Concept 3 by Lilywork Artisan Tile, LLC

6. Which of these social media platforms has helped your business the most? How?
We self-promote via our website, and Facebook, which have been useful tools for people familiar with our business to further explore our products and concepts. Houzz has introduced our business to a wider market not yet familiar with Lilywork. We would like to work more with Pinterest, as time permits.


Babylonia Listello with 1" Field Tile by Lilywork Artisan Tile, LLC

7. Where do you see the company going from this point forward?
Lilywork recently moved to Stonington, CT, and we look forward to working locally, and direct to the trade in our new location.


Iznik Listello with 2" Decoratives by Lilywork Artisan Tile, LLC

Name: Paul & Esther Halferty
Company(s) Name: Lilywork Artisan Tile, LLC
Email: info@lilywork.com
Phone: 215-859-8753, 860-599-6050

Facebook: www.facebook.com/LilyworkTile
Website: www.lilywork.com


If you enjoyed this post, you might also enjoy reading about these Tile Artisans:

Tuesday, September 10, 2013

Cement Tile Create a Warm Welcome


Traditional Gran Cordoba Cement Tile Polished

Traditional Gran Cordoba Cement Tile Polished 8"x8"
Photo courtesy of Avente Customer


When a customer requests a special size for their handmade cement tiles, we are more than happy to assist in meeting their design needs and special requests.

In this case, the customer needed an 8"x8" tile size of the Gran Cordoba Cement Tile pattern for their residential hall and bath. Because this pattern is only available in a 10"x10" format, the cement tile factory created a custom 8"x8" mold. Of course, there was an additional charge for creating a new mold; however, the customer didn't mind the extra charge if it meant they would achieve their design goal.

Further, rather than spending additional money for the border and corner molds, the customer chose the Cuban Heritage Design 250 Handmade Cement Tile 8"x8" Border and Corner Pattern to use with the field pattern, Gran Cordoba.

The colors used in this custom cement tile pattern include:
The customer used the Heritage Pale Green solid color tiles to fill the area outside of the rug. They also purchased strike-off samples of the border, pattern and corner to ensure color placement and design. You can see the entire process, from concept, design, and installation, on our Houzz Gran Cordoba - Luscen Custom Handmade Cement Tile Project entry.
How can we help you with your design needs today?

Featured Tile


Traditional Gran Cordoba Cement Tile Polished
8" x 8" Handmade Cement Tile


Cuban Heritage Design 250
Handmade Cement Tile


Heritage Solid Color Lemon Chiffon
8" x 8" Handmade Cement Tile


Heritage Solid Color Granada
8" x 8" Handmade Cement Tile


Heritage Solid Color Pale Green
8" x 8" Handmade Cement Tile


Heritage Solid Color Midnight Blue
8" x 8" Handmade Cement Tile


Pinterest logo

Pinterest: Leaves of Change


Avente Tile's Orange Board

Avente Tile's Brown board

.No spring nor summer beauty hath such grace as I have seen in one autumnal face.. . John Donne

Our Pinterest board selection for this month was inspired by the upcoming change of seasons where Summer will soon graciously give way to welcomed breezes, crisp air, and the richness of Autumnal hues such as yellow, orange, red and brown. Together with this seasonal change, our collection of Leaf Imprint Ceramic Tiles offers the perfect companion to all that nature offers.

Inspired? Then visit our pages on houzz.com, our boards on Pinterest, and browse through dozens of our Ceramic Tile Design Ideas portfolio page where you can find a large collection of projects showcasing our handmade and hand-painted ceramic tile, cement tile, decorative tile, mosaic tile, and so much more. Let us know how we at Avente Tile can assist you!


Ceramic and Cement Tile Prices will Increase

Due to increases in our costs, we must raise the price on many of our hand painted ceramic and cement tiles. We have not increased prices in over four years. The price increase is necessary for us to continue to provide the quality tiles and customer service you expect. We have avoided raising our prices for as long as possible, but we can no longer prolong the inevitable.

The new prices will be shown online and go into effect on September 14, 2013. The lines that will be increased are shown below. We will honor the current prices for any orders placed between now and September 13, 2013. Take advantage of the lower prices now if you were considering a purchase.

We thank you for your business and appreciate your understanding.

The following tile lines will be have new prices effective Sept. 13, 2013.

Field Tile

Arles

Celtic

Cracked Ice

Eartha Field

Fantasia

Gossamer Crackle

Pacifica

Pillow Chiclet

Spanish Field

Decorative Tile

Antigua Colonial

Barcelona

Birds & Nests

Cairo

California

Inner Piece

Mosaic Madness

New Iberica

Portuguese

Reef Mural

Sea Creatures

Spanish

Spring

Talavera

Whimsical Animals

Whimsical Sea Life

Cement Tile

Artist Series

Cuban Heritage

Fragments

Geometric

Heritage Molding

Heritage Solid Color

Textured

Traditional

Tuesday, September 3, 2013

Removing Grout Haze in a Cement Tile Installation

Let's face it, not everything goes right 100% all of the time. Even a well-planned project may encounter problems that nobody expected.  Nevertheless, it is always better to be prepared and know what problems to expect. Today, I discuss grout haze – a problem that often occurs with both ceramic and cement tile installations. I’ll explain what grout haze is, how to correctly identify the problem, and why it occurs. However, today’s post focuses exclusively on how to remove grout haze on cement tile installations.


Cement tiles that needs to be grouted

What is Grout Haze?

Grout haze is a white to semi-white haze left on the surface of tile after grouting. It is common for haze to remain even if you diligently wipe the surface with a wet sponge during installation. Don't confuse grout haze with similar looking problems created by:
  1. Applying sealer to a floor that is not clean. The floor wasn't clean when the penetrating sealer was applied and the sealer carried debris, dust, pigment and grout into the crevices.
  2. Efflorescence. Efflorescence or the formation of salt deposits as water evaporates or leaves from the lime and calcium found in concrete. This problem is usually mitigated with the application of a penetrating sealer since water can no longer pass.

Best Practices for Grouting Cement Tile

If you follow the best practices for grouting cement tile, there is a good chance you will never see grout haze. The most important points are to:
  1. Have fluid grout
  2. Float the grout diagonally across the joint
  3. Quickly remove excess grout with a float and sponge, before it begins to dry. 
 These same best practices are shown in the steps below.

Fluid grout ensures each joint is filled
Apply grout with a rubber float diagonally across the joints
Make multiple passes with the float
Remove excess surface grout
Remove any excess surface grout with float & sponge
Following these steps are the best way to avoid grout haze; but, they alone can't guarantee success.  We also have a great video demonstration on Grouting Cement Tile.

What Causes Grout Haze in Cement Tile Installations?

Grout haze is created by residual minerals left after water has dried from grouting. Remember that grout haze is caused by grouting and is a normal part of tiling. Grout is made of minerals and cement mixed with water. During the installation, the tile is entirely covered with grout because you need to smear grout across the tile. If the grout becomes slightly too dry or dry during application, it can penetrate the cement tile pores. The haze will become apparent after the water on the tile surface evaporates and leaves behind the minerals from the grout. Remember, the grout is applied between the spaces of tile using a tile float, and then wiped away with the same tile float and a wet sponge.

The photo below shows some grout haze. The grout haze is the chalky white specs on the dark green and dark blue.

Cement tile with grout haze

Removing Grout Haze

First Rule: Don't panic. If the haze is caused by grout, and not efflorescence, it will often disappear with frequent mopping. Grout may stubbornly adhere to cement tile pores; but, with enough water and elbow grease, it will release. In general, avoid grout haze removers because they are slightly acidic and will damage the tile. I have no experience with such cleaners.

Here is what I usually recommend. These guidelines apply only to cement tile installations.
  1. Make sure to physically remove as much grout as possible with a rubber float and then with a sponge.
  2. Start with a Light Buff & Clean. Buff the floor with a floor polisher and white pad. Use just a bit of water and change the pads frequently to encourage the clean-up of any grout.
  3. If you don't achieve the results you are looking for, attempt a Deep Cleaning. A deep cleaning is achieved by buffing the floor with a floor polisher and green pad using a lot of water and pH neutral soap. This must be done prior to applying a penetrating sealer. The goal is to really clean the floor of any dust, grout, pigments or debris prior to sealing. The use of a floor polisher and green pad isn't usually necessary on polished tiles. Polished cement tiles are "buffed" at the factory to achieve a satin sheen that simulates the look the tiles acquire after years of normal use and care. The surface of a polished tile is smooth compared to an unpolished or raw cement tile. The smooth surface of a polished tile makes it easier to install because grout is less likely to penetrate the tiles.
  4. In locally severe locations, use 800 grit wet sandpaper and water to remove excess grout.
It gets down to this. Cement tile is fairly easy to clean with a floor buffer or rags, water, soap and elbow grease. Occasionally, fine grit wet sandpaper may be required to remove excessive deposit of grout. Protect cement tile from oil and acids that will severely damage it.