Tuesday, June 19, 2012

A Cement Tile Kitchen Backsplash Makes a Chelsea Remodel

New York resident, Constance Zaytoun and Marc Weitz, share some "before and after photos" of their recently completed Chelsea kitchen remodel. The transformation is nothing short of amazing. What makes it even more unbelievable is that Constance didn't hire a designer. She managed all of the construction work herself. All while working and attending school, as I found out later.


A Cement Tile Backsplash adds WOW to this Kitchen Remodel!

Who wouldn't want to savor a cocktail here? Or, make Ratatouille with summer-fresh vegetables. Now look at the "before photo." Yikes! You really need some vision to turn this kitchen around! When you see the transformation you begin to understand that with the right design, anything is possible. Don't be fooled though, these changes take hard work and effort; but, they really are worth it. And what a difference they make! For the record, I refer to Constance in the rest of today's post since I worked with her entirely. But, I know Marc was a major force in the success of this project, too!


Kitchen Before Remodel

When Constance called Avente and spoke to me, I knew she had been talking with other cement tile vendors. She asked detailed questions and was frustrated because of the minimum order quantities that many vendors impose on tile that is "made to order." Avente Tile offers many patterns that don't require a minimum quantity or incur small order surcharges. Constance looked at our cement tile catalog and found a few patterns that she liked. She followed my advice and ordered the Eight Piece Heritage Color Chip Set. I explained that this step will help finalize a design, Once you approve the choice of Heritage colors for the Ocoa and Romana patterns, You can then finalize a pattern.

Because we don't stock custom, "tile design lines" like our Traditional Cement Tile, you should plan on purchasing a strike-off sample to confirm the color, pattern and design. Constance also purchased a sample of the Mission Trebol A because she liked the pattern and sample stock was available. Once you find a pattern you like, you need to decide on colors. Color chips are necessary. You need to see the texture and how the colors "partner" with other finished surfaces and area light in your home.

Three Cement Tile Patterns Considered Toward the Final Design Stages


Mission Trebol A

Mission Trebol A
8" x 8"

Traditional Ocoa
Traditional Ocoa
8" x 8"

Romana Cement Tile Pattern
Traditional Romana
8" x 8"

Constance liked the Heritage colors but wasn't certain whether to go with the the Ocoa Cement Tile or Romana Cement Tile for the kitchen backsplash.

I recommend getting strike-off samples for any tiles that are custom or when sample stock is not available in standard colorways. You really need to see the tile you are purchasing before a full order arrives at your door step. These are custom, made-to-order tiles just for you. They can't be returned. A few strike-off samples cost about $150 - $400 since they need to be shipped via International Air. It may seem like a lot of money to spend for a small tile job like this; but, it is the cost of a custom design and absolutely necessary. Too many times, I've seen designers and architects disappointed with the colors used on a pattern after seeing a strike-off sample. There might not be enough contract and the pattern "fades" or two much contrast and the pattern creates an unexpected effect.


In a well-designed kitchen all of the surfaces complement each other

In about two weeks, Constance received her strike-off tile samples and you can see Romana was her choice. In the end, this was the best choice because it maintain the clean lines and style in this contemporary kitchen.

The kitchen features some extraordinary materials that all work together to create a warm, inviting kitchen that pops and with energy. The kitchen's cement tile backsplash is definitely the focus. Cement tiles aren't commonly used in kitchen backsplashes or wall installations in the US. However, it is very common in Europe.

Nice choice of color and finishes
A non-traditional mix of texture and color in the other finished surfaces is flawlessly combined to create style and atmosphere. The Zinc countertops are a striking touch and have a hand-made edge finish. They are made in California by Copperworks. The wall cabinets are made by Ikea: Rubrick blue accent glass doors with aluminum edge. the color goes great with the cement tile! The base cabinets are maple-faced and sport groovy bakelite knobs and pulls. You'll find Portola Paints Hollywood on the walls and Globe Thistle on the soffit ceiling.

The kitchen is well-appointed with top-notch tools. There's going to be some good cooking in this kitchen with a Fagor refrigerator, Viking range, Bosch dishwasher, Kraus faucet, Houzer sink, Elica hood, and GE microwave.

The Romana Pattern is used for this Cement Tile Backsplash

The front door is the original metal fire door. It was stripped to bare metal. The open wall shelves are from IKEA and painted with Annie Sloan chalk paints in Paris Grey and Arles.


Solid Color Cement Tiles can be bull-nosed to provide a finished transition


Pendant lights by Original BTC and a Possini ceiling fixture. The flooring is Jelinek Cork Mosaic. And hardwood floors were refinished with Rubio Monocoat fume and silver grey oil plus.Angled power strip and under-cabinet lighting is by Task Lighting.

I hope you enjoyed seeing Marc and Constance's remodeled Chelsea kitchen. What a stunning and well-executed design. Kudos for a job well done! I hope you have a better idea of what to expect when using cement tiles for your project, too. Call us to discuss your project. Take your time and browse our Cement Tile collection and photos of cement tile design ideas. You are sure to find a pattern, color and style of cement tile that speaks to you. Now, create the kitchen of your dreams with handmade cement tile.

Tuesday, June 12, 2012

Tips for a Successful Cement Tile Layout

We've shown how to create a cement tile floor plan or layout for large patterns and layouts for double double border patterns. Today I'll share a recent project where Avente Tile provided layout design options for a customer that wanted to use concrete tiles for her patio.


A Cement Tile Rug or Carpet Installation


The customer wanted a tile rug that would take up the entire rectangular area of the patio floor space. She wanted the patterned field to be framed with a single row of border tiles that would run next to the edge of the patio. She needed a floor tile plan or layout drawing to help visualize the tile layout and determine the quantity of tiles needed. She wanted to use 12"x12" Colonial border tile with an 8"x8" Mission Espanola field tile. The colors for the pattern tiles were all specified using the Mission Color Palette. To complicate matters the patio was irregularly shaped.

To determine the tiles you need, start with a scaled drawing of the patio. Make a rectangle in the main area and find the center. This is where the tile rug will be. Start laying tile from the center out using paper and pencil, rather than mortar and grout. Right away you'll encounter any problems with the layout that you will need to take into consideration and resolve. You can see this design isn't going to work. Something has to give. We can't place the border pattern along patio's edge without making unsightly cuts. In the drawing below, we show this by the uncut tiles on the left.


Original Layout – Showing problems with Larger Border Tile


I generally don't recommend a border pattern that is a different size from the field because for this very reason. It adds complexity to the layout design. If you choose to use border tiles that are a different size than your field tile, your rug width and length will have to be a multiple of both tile sizes to avoid cutting the border tile and disrupting the pattern. If you are using an 8”x8” field tile for the rug and trimming with a 12”x12” border; the width could be 48” (6 tiles x 8” = 48"; 4 tiles x 12" = 48").

So, we did just that. We found multiples that would work! The rug has to be 48" x 168". That's the only way it can work without cutting tiles. Notice, you still have "one-half a pattern" of field tile on the left edge? Not ideal.


Alternate Layout – Using 12" Border Tiles around 8" Field Tile


Therefore, we presented another option using an 8" tile for the border that the customer liked. Here's the result: a winning cement tile layout!


Accepted Layout – Using 12" Border Tiles around 8" Field Tile


I'm really pleased with the final design and so is our customer. The tiles have been ordered and arrived. They should be installed soon. I can't wait to see the cement tile patio! What about you? What design to you prefer?


A Successful Cement Tile Installation


Tips for a Successful Cement Tile Layout

  1. Generally, use the same size border tile as field tile. It makes the installation and layout much easier.
  2. If you choose to use border tiles that are a different size from your field tile, your rug width and length must be a multiple of both tile sizes to avoid unsightly cuts in the border pattern. If you are using an 8"x8" field tile for the rug and trimming with a 12"x12" border; the width could be 48" because it requires exactly six 8" tiles and exactly four 12" tiles.
  3. Don't run the border to the edge of the room. Even if it fits; nothing is ever square and they'll need to be cut. Cuts on pattern tile really accentuate a room being "out of square." Allow for at least one or more rows of solid-color fill tile outside the border. Fill tile are solid color tiles that fill the irregular parts of the room outside the border.
  4. Center the rug in the main area of the irregularly shaped room. This will usually be a rectangular shape, so it's easy to find the center. Make sure you use the same number of tiles on each side of the long axis.
  5. Create the floor layout plan to scale otherwise the drawing is useless. Any obvious omissions or errors will become obvious with a floor tile plan or layout for your cement tile installation. It's also a great way to communicate with your installer and avoid costly installation errors.


Related Posts about Cement Tile Layout

Thursday, June 7, 2012

Tile Talk Newsletter - June 2012

Project Pick: Cuban Cement Floor Tiles for a French Moroccan Bath

Cuban Cement Floor Tiles for a French Moroccan Bath
Photo credit: Celia Reiss Interiors

This month's project pick comes from Celia Reiss. She is a designer at her firm, Celia Reiss Interiors, in Manhattan, New York. Celia shared an image showing how she used Cuban Heritage cement tiles in a design for her own bathroom. Celia loves cement tiles and it shows in this design!

"The tiles were installed in my own home to be able to show my clients how fabulous it would look."

- Celia Reiss of Celia Reiss Interiors, Manhattan, NY

I love that the floor tile wraps up to surround the bath. The tiles carry the pattern on both vertical and horizontal surfaces creating a very sophisticated look. The bath tile is in perfect balance with the floor tile. The antiqued wood vanity with marble top creates a rich, but comfortable space.

Find out more about this project and Celia's design on our blog, Avente Tile Talk. There are great ideas for anybody that is considering a cement tile floor. Read:

>> A Designer Chooses Cuban Tiles for her Bathroom

You can see more images of this project on her blog at Bathroom with a French Moroccan twist. There are wonderful images that detail the vanity, pulls and sink - not to mention the tile.

The cement floor tiles are all 8" x 8". The cement tile pattern is Cuban Heritage Design 140-2B with the contemporary colors of Light Turquoise, Brown, and Caribbean Blue. Celia wisely chose not to use the border pattern for this design because the bathroom isn't big enough to accommodate both a bold border and intricate pattern. The field pattern uses only Light Turquoise and Brown:


Light Turquoise

Light Turquoise

Brown
Brown

Cuban Tile patterns are characterized by elaborate designs, bold colors and prominent borders or double borders. The Cuban Heritage cement tile patterns are from cement tile installations found in old homes or estates in Cuba.

Cuban Heritage Design 140 comes in four standard colorways:


Cuban Tile Pattern 140-1A


Design 140 1A

8" x 8"


Cuban Tile Pattern 140-2B

Design 140 2B

8" x 8"


Cuban Tile Pattern CH140-3B

Design 140 3B

8" x 8"


Cuban Tile Pattern Design 140-4A

Design 140 4A

8" x 8"

>> See the collection of Cuban Tile Patterns


Experience the Color of Provence in Arles

Cote d'Azur ner Roqubrune

Cote d'Azure near Roqubrune
Provence is the inspiration for the colors in Arles

Have you seen our new line of field tiles? Arles is a handmade tile with a stunning, reactive glaze in colors reminiscent of the seasons in Provence. If you've ever felt a cold Mistral blow against your face or seen the hay dry in the fields on a warm summer day, you'll begin to see and feel the colors in Arles.


Arles Field Tile in Mist
Arles Field Tile & Trim in Mist

Arles is available in five colors: Aqua, Mist, Hay, Cork, and Wheat. Each color is stocked in a 4"x4" field tile, a molding, and a simple liner. Rhomboids are also available. When purchasing samples, make sure to be get at least four different pieces so that you get a good idea in the variation of color.

Arles Field Tile in Hay

Arles Field Tile & Trim in Hay

There’s something very unique about the rich glazes in the Arles Field Tile. They are full of movement. The tiles are fired differently with a glaze that is reactive to the local terracotta body. It is this combination that gives each tile such distinctive qualities. The owner of the design studio where Arles is made explains, "Basically, this combination is what makes this line is so different. There is great variation in the glaze color ranges. The reactive glazes change so much, so it is never the same twice." And, don't forget, Arles is 100% handmade. You'll see the hand of the artist in each tile body and in the glaze.


>> View Arles Field Tile

>> Read Blog Post: Arles Handmade Field Tile


Tile Tip:
If you are tiling a newly finished and poured concrete slab, allow adequate cure time for the slab to avoid grout cracks. Cement shrinks as it cures and excess moisture evaporates. If tile are applied too soon, while the concrete is still shrinking, grout is likely to crack. The TCNA (Tile Council of North America) suggests a 28-day cure for concrete before tiling. Also, the TCNA cautions that many factors must be considered before determining the appropriate cure time to avoid grout cracking.

Find out more and read:

>>Our blog post on Why grout cracks in tile installations
>>TCNA's recommendations on Concrete Cure Times before Tiling

Tuesday, June 5, 2012

Spanish Tile as a Building Material


Ceramic tile use throughout Spain is prolific. Not only can it be seen on the floors and walls of Aragonese countryside homes, but ceramic tile also plays an integral role in the everyday functioning of many embellished palatial royal dwellings. It wasn’t until 2011 when I realized just how much of a role ceramic tile played, not only in the current day-to-day daily life of Spaniards, but the depth and complexity of historical value.


Spain ceramic tile historical handmade handpainted
The Basilica Nuestra Senora del Pilar, as viewed from across the Ebro river, features vibrant blue, green, yellow, white and ceramic tile on its main dome, as well as its 10 smaller domes.


Last year, along with four members of the architecture and design (A&D) community, I was asked to join the second edition Tile of Spain’s “Reign in Spain A&D Tour.” Tile of Spain is the umbrella brand managed jointly by the Trade Commission of Spain in Miami, FL, and the Spanish Ceramic Tile Manufacturer’s Association (ASCER) in Valencia, Spain. The annual media tour to Spain coincided with Cevisama, the International Ceramic Tile and Bath Furnishings Show held in Valencia. 


The group of architects, interior designers and journalists, including myself, traveled to the cities of Zaragoza, Teruel and Valencia – admiring the Spanish architecture, culture, and culinary temptations – with Cevisama being our final destination. 


Shortly after our arrival to Spain, we were taken to Zaragoza, the capital of the region of Aragon. Located on the banks of the Ebro River, halfway between Madrid and Barcelona, Zaragoza hosted Expo Zaragoza in 2008, where the country showcased its commitment to water conservation, the preservation of the environment and its utilization of sustainable practices. Of course, ceramic tile and terracotta played an integral role in all of this.


terracotta ceramic tile sustainable eco-friendly
The Spanish Pavilion on the grounds of the 2008 Water Expo features 750 terracotta pillars.


ceramic tile handmade exterior reflective energy efficient sustainable
The Conference Center of Aragon utilizes 120,000 triangular pieces of ceramic tile on the exterior walls and roof lines.


Walking through the Plaza de la Seo in Zaragoza, we came upon two basilicas, the Cathedral of San Salvador (La Leo) and Nuestra Senora del Pilar. Without a doubt, ceramic tile played both an aesthetic and architectural role in both of these historical structures. The blues, greens and yellows are as vibrant as when they were first applied to the brick exterior of La Leo and to the many baroque domes of Basilica del Pilar.


ceramic tile historic installation handmade hand-painted sustainable artistic
The tower wall of Basilica of San Salvador (La Leo) features various shapes, colors and sizes of ceramic tile.

ceramic tile historic installation handmade hand-painted sustainable artistic
A detailed view of the wall shows the vibrancy of the colors and painstaking detail of this installation. 


In my next post, I’ll focus on Teruel (a World Heritage city designated by UNESCO). As a center for Mudejar art, a style influenced by Islamic tradition and more contemporary European architectural styles, the fortress-like city is characterized by extensive use of brick and glazed tiles within its architecture. In the meantime, you can check out the beautiful hand-painted ceramic Spanish tiles offered by Avente Tile. 


Tuesday, May 29, 2012

Why grout cracks in tile installations

The most visible part of any tile installation is, of course, the tile but what is the next thing you see. The grout! The grout, in many ways, is more visible as the smaller lines that make that up can draw your attention away from the tile itself. If those grout lines have cracks or are crumbling, your eye will naturally shoot right to it.

So let's look at few things and how they should be handled to make sure that the grout you use compliments your beautiful tile. Do you know the difference between sanded and unsanded grout and where each should be used? Now the difference in the two is easy. One has sand, one doesn't.

Applying grout

Now where to use which one is determined, not by the tile itself, but rather by the width of the joint between them. 

"Narrow joints of 1/8 inch or less call for unsanded grout, a pudding-smooth blend of Portland cement and powdered pigments mixed with water. Joints wider than 1/8 inch get sanded grout — the same material, but with sand added. The sand helps bulk up the grout and keeps it from shrinking in the joints." - ThisOldhouse.com

Now why does grout crack? You've applied the proper grout but down the road cracks start to appear in your grout lines and there can be many reasons but most have to do with the installation long before the grout was added. Most of what we will look at today is in reference to flooring but there are many points that are similar with all tile installations.

1. The first potential reason is that the thinset below the tile was improperly applied and does not have enough thinset.

Thinset application on floor

2. The subfloor is moving and as it moves the grout lines crack.  Did you apply the tile directly to the wooden subfloor? Tile should never be applied to a wooden subfloor due to the natural movement that is part of wood.

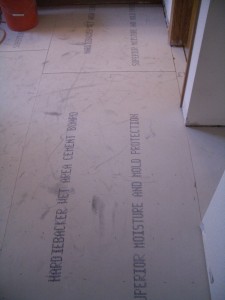
3. Was the cementious backer board that was applied over the subfloor installed correctly? Maybe there weren't enough screws or thinset below or it was spaced improperly. Any of these could cause movement and that causes cracks.

Cementious backer board installed

4. As another possibility- Is there adequate space between your wall or wooden trim and your grout? Grout doesn't contract and expand but wood does and that could be part of the issue too. It is a good idea to leave a 1/4" space between any tile and wooden baseboards or trim so that if the wood expands, it will not apply pressure to the tile and possible crack the grout. To accomplish this a "shoe" molding can be applied to the baseboard, effectively covering the gap and allowing the baseboard to move above the tile while applying no force to the tile or grout.

5. Did you apply your tile on a newly finished/poured concrete slab? Concrete has to cure and as it does it moves, so if your concrete floor or base is new and the tile was applied too soon, it could be the reason your grout is cracking. 
I would also add there could be other reasons for grout to crack other than those listed above such as improper mixing  ie too much water in the mix. This would cause the grout to improperly dry leaving it prone to cracking later.  It could also be that water was added again later in the mixing process and this will cause the grout to be dry and crumbly.

Now if you are still in the planning stage I would offer a suggestion or rather a product and installation method that will help avoid the problem of movement and grout cracks. It's a mat that is laid in a bed of thinset and then a layer of thinset is applied above with the tile and grout.

Schluter- Ditra-X for floor tile installation

Schluter-DITRA-X


What this mat does is provide a separation between the sub flooring material, whether that be wood or concrete so that if there is movement in the concrete/wooden sub floor, it will not translate up into the tile and grout and cause cracking.The mat will take the added stress of the movement below and not the tile/ grout therefore helping to eliminate cracking. For further reading about this product-http://www.schluter.com/Schluter-DITRA-XL.aspx 


As we have pointed out before, planning ahead and armed with knowledge will lead to a successful installation as it is so much easier to do right the first time than have to go back and correct later.


Tuesday, May 22, 2012

Arles Handmade Field Tile

Today I'm excited to highlight our new line of field tiles, Arles. Arles is a handmade tile with a stunning, reactive glaze in colors reminiscent of the seasons in Provence. If you've ever felt a cold Mistral in your face or seen the hay dry in the fields on a warm summer day, you'll begin to see and feel the colors in Arles.

Lavender field
Lavender field
Provence is the inspiration for the colors in Arles

There’s something very unique about the rich glazes in Arles. They are full of movement and fluctuation.

Arles is available in five colors: Aqua, Mist, Hay, Cork, and Wheat. Each color is stocked in a 4"x4" field tile, a molding, and a simple liner. Rhomboids are also available. When purchasing samples, make sure to be get at least four different pieces so that you get a good idea in the variation of color.

Aqua ranges from inky black to aqua blue.

Arles Field Tile in Aqua
Arles Field Tile & Trim in Aqua

Mist is an intense, blue-grey tile.

Arles Field Tile in Mist
Arles Field Tile & Trim in Mist

Cote d'Azur ner Roqubrune
Cote d'Azure near Roqubrune
Provence is the inspiration for the colors in Arles

"We use a local terracotta body which allows the titanium oxide in the glaze to move the way it does. We fire it differently than our other ceramic tiles too, and that’s why each tile has such distinctive qualities," explains the owner of the design studio where they are made.

"Basically, this combination is what makes this line is so different. There is great variation in the glaze color ranges. The reactive glazes change so much, so it is never the same twice." And, don't forget, Arles is 100% handmade. You'll see the hand of the artist in each tile body and in the glaze.

Hay ranges from yellow to light brown.

Arles Field Tile in Hay
Arles Field Tile & Trim in Hay

These tiles are suitable for all indoor wall applications. They can be used in outdoor locations; but, not in frosty environments.

Cork is a mixture of rich, matte chocolate shades.

Arles Field Tile in Cork
Arles Field Tile & Trim in Cork

Wheat is a saturated earth brown that varies from medium to dark.

Arles Field Tile in Wheat
Arles Field Tile & Trim in Wheat

With its slightly irregular, handmade rustic-body, Arles looks great when laid with wider grout lines. Because there is a high degree of variation in the hand-painted glaze colors, it adds interest and movement to any installation. Arles is a great way to achieve a rustic or relaxed feel with field tiles and bring the colors of Provence into your home.

Tuesday, May 15, 2012

A Designer Chooses Cuban Tiles for her Bathroom

A few weeks ago a Manhattan designer, Celia Reiss, called to purchase some more Cuban Heritage cement tile samples. She mentioned that the Cuban Tiles she purchased at the beginning of this year had been installed and she was really pleased with the design. I am, too! Here's the results.

Cuban Tiles for a Bathroom by Celia Reiss Interiors

I smiled when Celia informed me that she installed the tiles in her home. She went on to explain, "The tiles were installed in my own home to be able to show my clients how fabulous it would look." All of the design and photo credits go to Celia Reiss Interiors. For more photos of this project read her blog post, Bathroom with a French Moroccan twist. Don't miss her most recent projects on the Celia Reiss Kitchen and Bath Blog.

Cuban Tiles for a Bathroom by Celia Reiss Interiors

One design element that I love is that the floor tile wraps up to the bath – carrying the pattern on both vertical and horizontal surfaces. This creates a very sophisticated look. The bath tile is in perfect balance with the floor tile. The antiqued wood vanity with marble top creates a sumptuous, but comfortable space.

Cuban Tiles for a Bathroom by Celia Reiss Interiors

The cement tile pattern is Cuban Heritage Design 140 with the contemporary colors Light Turqoise, Brown, and Caribbean Blue. The cement floor tiles are all 8" x 8".

Cuban Tiles for a Bathroom by Celia Reiss Interiors

I was intrigued by the vanity. Celia informed me that, “The vanity I got at the major flea market in Paris, Le MarchĂ© aux Puces. We had it shipped back. The handles say Paris on it. The sink itself is actually two sinks. The top one is like a basin without a hole, and it tips into the second sink, which has the drain.”

Cuban Tiles for a Bathroom by Celia Reiss Interiors

You can see more images of this project on her blog at Bathroom with a French Moroccan twist. There are wonderful images that detail the vanity, pulls and sink - not to mention the tile. To find out more about the designer, visit her website, Celia Reiss Interiors. You should also visit Celia Reiss Interiors Kitchen and Bath blog to see photos from other installations.

Cement tiles are an excellent way to add interest and style to a bathroom floor. Thank you so much for sharing your style and photos, Celia. Your bathroom is stunning and I love the personal touches. There is no better "seal of approval" than a designer using a product in his or her own home! We’re so glad we could help achieve this stunning look with our Cuban Heritage tiles.