Showing posts with label Tile layout. Show all posts

Tuesday, September 9, 2014

Glazed Bricks Provide Versatility for Classic to Contemporary Design

Our newest line of tile takes its cue from simplicity and ease. If you like the classic look of subway tile, then you're to love the look of our Glazed Brick series. This versatile line is great for backsplashes and walls for both residential and commercial applications.


Avente Tile's Glazed Thin Brick comes in six colors.

Pick a Color or Use Them All!
Our glazed think brick is available in six colors: cinnamon, mustard, pewter, storm, white, and washed. Use a single color or use both whites for a tranquil, contemporary design. However, because I love color, I think the tiles are most captivating when an array of colors is used to create a mosaic.

Mustard
Cinnamon
Pewter

Storm
White
Washed
Our Glazed Brick is in stock and ready to ship. It is frost-resistant; but, not frost proof. As with all of our hand-glazed items, natural variation is inherent in color, texture and finish. Approximate dimensions are: 2-1/4" x 9-1/4" x 3/4"-thick.

Horizontal Glazed Brick Layouts
Classic and timeless, horizontal layouts honor the love of subway tiles. Keep it simple with a basic offset, or add interest with a quarter offset layout. The stacked pattern offers clean lines, which works well with contemporary designs.

Offset Tile Layout for Glazed Thin Brick
Offset
1/4 Offset Tile Layout for Thin Glazed Brick
1/4 Offset
Straight Set Tile Layout for Thin Glazed Brick
Straight Set

Vertical Glazed Brick Layouts
Newer and bolder, the upward orientation of vertical layouts provide the illusion of height or can be used to create striped designs with two or more colors. Staggered or off-set vertical arrangements lead the eye upward and can make a short galley kitchen with low ceilings appear larger and slightly more expansive.

1/4 Vertical Offset Tile Layout for Thin Glazed Brick
1/4 Vertical Offset
Vertical Offset Tile Layout for Thin Glazed Brick
Vertical Offset
Vertical Straight Set Tile Layout for Thin Glazed Brick
Vertical Straight Set
Herringbone Layout for Thin Glazed Brick
Handsome and sophisticated, the woven look of a herringbone pattern offers texture and distinctive style. It's a great look for a bathroom wall or kitchen backsplash.

Herringbone Tile Layout for Thin Glazed Brick
Herringbone

Our new line of thin Glazed Bricks in six colors is a great way to achieve the cherished look of subway tile. But, the natural variation of color from hand-glazing, combined with the texture from the brick, will add interest and a new twist to your design. See our new line of thin Glazed Bricks today!

Tuesday, November 12, 2013

Create a Spanish Tile Design with Rustic Pavers

A beautiful floor tile design really makes a tremendous statement in your room. There is so much more to a floor than the tile itself. The pattern or layout of the floor tiles along with the accent tile will change both the look and the feel. It’s definitely a case where the sum is greater than the parts.

The Spanish Floor tile layout makes this hall seem quite grand.
The Spanish Floor tile are placed On Point to make this hall seem grand.

I’ll share some inspiring floor tile designs that will help you plan your own project. Learn how to use traditional patterns and designs to create your own unique floor tile layout. Don’t be afraid to get creative – I recommend getting several square feet of the tiles that interest you. Try different tile formats and/or shapes in various layouts. Add smaller dot or accent tiles for color and texture. The tile layouts in today's post are primarily used for tile with rectangular or square shapes. If you are thinking about using arabesque patterns or other shapes like a hexagon or octagon, then stay tuned. We'll discuss those tile layouts in an upcoming post.

Tips for Floor Tile Design

Before you select your tile, think about how you might like to lay it out. Choose a tile that is available in many different shapes to give you the most flexibility. Our Rustic Paver formats are available in these shapes and are made to order.


Rustic Paver Formats
Rustic Cement Tile Paver Formats and Sizes

Choosing a floor tile can be intimidating because the choices are expansive. Focus only on the room (patio, bathroom, kitchen, and sun room) where the tile is being installed. Follow these steps, and deliberately choose:
  • Tiles appropriate for the application or use (residential floor, swimming pool sideboard).
  • A theme for the room (such as, mid-century modern, Spanish Revival, or seashells for the bathroom, chickens for the kitchen).
  • A color scheme. Focus on a main color and one or two accent colors.
  • Design elements that support or work with your theme and color choices (crackle tiles for a rustic look, hand-painted tiles for a Spanish home, blue pool tiles).
  • A floor tile layout. Start with a look or pattern you like from those below, or you can view even more Tile Paver Patterns online.

Common Floor Tile Design Layouts

Grid or Straight lay. This straight-forward tile showcases the beauty of the tile.

12"x12" Rustic Pavers (Hermosa Blend) on a straight lay or grid.
12"x12" Rustic Pavers (Hermosa Blend) on a Straight Lay or Grid.
Brick, Running Bond or Offset. Tiles are offset by half the width of the tile. Works with rectangular and square formats. This is a nice way to blend tiles of different color.

Rustic Spanish Pavers (Cotto Dark) in a Running Bond Layout
Diagonal or On Point. Tiles are set at a 45-degree angle to the room walls. This layout will generally give the room a larger feel.  Mix with a grid layout to provide interest between rooms or transitions where the same color tile is being used.

Heritage Cement Tiles (Fire Brick Red) Laid on Point
Heritage Cement Tiles (Fire Brick Red 8"x 8") Placed On Point.
Checkerboard. Tiles in two alternating colors are placed straight or on point. Traditionally done with black and white or other high contrast colors.

Checkerboard  Layouts use tiles in two alternating colors.
Checkerboard  Layouts Use Tiles in Two Alternating Colors.
On Point with Dots. Field tiles are notched for small dot tiles. The dots are accent tiles that can be placed on a regular pattern or randomly.

Spanish Floor Tile on Point with Accent Dots
Spanish Floor Tile On Point with Accent Dots
Spanish Tile Dot with On Point Paver Layout
Hopskotch or Pinwheel. A small square tile is surrounded by four larger ones on each side. Only specific ratios of tile will for this layout Works well for plain tile or incorporating decorative tiles with an accent.

A Pinwheel Layout Using Spanish Tile as Accents.

Create your Design with Rustic Pavers

Our Rustic Cement Paver Tiles are the perfect choice if you want to create a stunning floor design using patterns. You’ll find both Classic and Premium colors. Classic color pavers have the same appearance as clay bisque tiles and offer the look and feel of tile floors found in Mediterranean climates. Premium Color pavers include both bisque and more contemporary colors.
Start designing a rustic paver layout today to create a unique and stunning floor. Click the link below to view our catalog of Rustic Paver colors, formats, and options, or call us at 888.739.4972 (Toll Free). We are open 9 AM - 5 PM PST, Monday through Friday.

Tuesday, October 1, 2013

Cement Tile Layout Guide & Checklist

You've been looking at cement tile patterns for months, debated color schemes and palettes, considered custom cement tile options and now are ready to order the tile! STOP! 

Cement Tile with Traditional Rug Design

Before you place your order, first decide how the tile will be installed, and make sure to measure twice, or even thrice! There is nothing worse than waiting eight weeks for your tile and find out you didn't order enough! But don't despair, our handy cement tile layout guide can work as a checklist so you can ask all the right questions and find the answers you need in no time.

There are two layouts to consider when you install patterned cement or concrete tile:

1. Framed or Rug design uses a border and plain tile to frame the main field pattern. Achieve the classic look of a tile rug on your floor with a border. The border cement tiles should frame the patterned field tiles and provide interest without distracting your eye from the main field pattern.


Rendering of a Cement Tile Rug with Border and Plain Tile


2. Full pattern repeat is where the pattern runs to the edge of the room or space and isn't framed with other tile patterns. This works great for irregular-shaped rooms or for a slightly more contemporary look.

Cuban tiles in this entryway are run to the edge of the room for a full pattern repeat.

Cement Tile Design Tips for Full Repeat Patterns

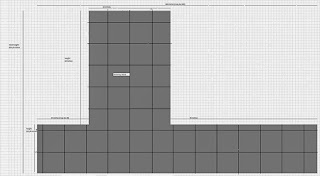
When laying patterned or plain tile for a backsplash or floor, you want to minimize cuts in the main field. This means cuts to the tile should be only around the edges and the pattern should be centered in the space to captivate your senses. For floors, you'll start in the center of the room and work your way out to the walls; making cuts only to those tiles near the edge of the room. For a backsplash, you can achieve this by, by starting the pattern at the vertical centerline and working up from the counter or baseboard. Here's a recent layout I provided to a customer for their backsplash. The customer provided a scaled drawing of the area above their counter and behind the stove. The grey area is their backsplash and shows what they want tiled with cement tiles. The pattern starts at the counter and works up. The cut tiles on the vertical runs are close to the same width on both sides.


Cement tile Backsplash Layout with Large Dark Grid Lines showing placement
Backsplash Layout with Large Dark Grid Lines showing placement

Cement Tile Design Tips For Rug Layouts

Rug layouts are the most difficult, so start with a scale drawing of the area to be tiled. Find the center of the room and start your pattern for the main field in the center, too. Working out to include the border at least one tile width away from any irregular shapes or walls. Avoid cutting tiles for any reason that are inside the rug.
 
For a quick way to determine the number of tiles required and the approximate rugs sizes, I recommend creating a scaled grid that overlays the area to be tiled.  It allows you to easily sketch out the rug and move it until you are pleased with the layout. It’s a great way to estimate the tiles and determine the size of the rug. You'll need to determine the rug dimensions in order to calculate the required border tiles.


Cement Tile Rug used for Entry.

In this recent customer layout, using a grid overlay, we could quickly center the rug for each area and then resize to make sure we didn't get too close to an edge, as well as account for irregular shapes, and have a full repeating quarter design pattern.

A Grid Pattern & Scale Drawing Provide a Quick Rug Design & Layout
A grid pattern & scale drawing provide a quick rug design layout


Remember, DO NOT run the border right to the edge of the room. Leave at least 3- to 4-inches between the outside border and edge of the room for a plain, solid color "fill tile." Room edges are never square and cuts to the border will emphasize this, thereby guaranteeing an unprofessional or undesirable result. Cuts that are not true or square won't show on a plain tile because there is no pattern.

This grid overlay method works well for estimating tile quantities and approximate rug size; but, it’s still a good idea to have a detailed layout drawing or finished floor schedule. In fact, a detailed layout drawing will provide the best idea of look, point out any flaws with the layout, and clearly communicate your desires to the installer. With a detailed drawing you can better visualize the space and you might be surprised what will work. 

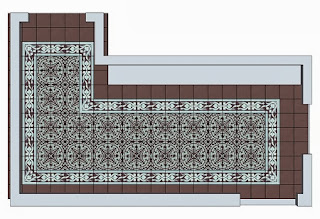
For instance, in the design below, the customer decided that a full pattern repeat wasn't required for the short part of the L-shaped rug below. While I recommend keeping a full pattern repeat on most rug layouts, I love this layout and agree with the customer that it really works. The detailed drawing helped us find the balance between border, pattern and background it a tight and somewhat awkward space.


A detailed layout drawing of the cement tile is the best way to visualize the layout
A detailed layout drawing is the best way to visualize the layout

Cement Tile Design Inspiration

We hope this post offered you a better understanding of tile rugs, how to create cement tile patterns, when to use plain tiles, and why a layout is so valuable. If you still aren't sure what design, floor play or layout is right for you, then let us lend a design eye. We'll help you find inspiration that is right for you! Take a look at these featured installations:


Cuban Heritage Cement Tile Pattern with Full Repeat

Cement Tile Design Resources

These helpful resources will guide you to ask the right questions and find the correct answer regardless of the cement tile design and installation you choose.


Cement tile rug with plain yellow tiles for the field.


Let our passion for cement tile help you!
Our passion for cement tile has led us to create one of the broadest collections of cement tile anywhere. Our experience and knowledge of this hand-crafted product will guide you to make the right decisions 

With over a decade of experience selling cement tile, we care intensely about finding the right cement tile for you! Visit our handmade cement tile information center, you 'll find links to resources that will answer all your questions about cement tiles. If you don t find answers, let us know by completing our Request Information form, or by calling us during business hours at 888.739.4972 9-5 PST M-F.  We look forward to talking cement tile with you.


Tuesday, March 27, 2012

Tile Layout - Planning and Preparation Are Key

After you have made some choices for what style and type of tile you would like for your project, the next step is to determine the tile lay out. This is the planning stage to ensure that your project comes out looking perfect. To start things off I measure the floor or wall areas to be tiled. Then using graph paper I transfer these measurements to my sheet. There are also software programs that are available from Laurel Creek Software and others that will aid in the process. I, personally, have not used any so if you have, please leave us a comment below.


Now once I have discussed the desired pattern with the client, I then have to see how it will work into the space. Therefore my next step is to take the tile dimensions and put them into the graph and see what it will look like. I also have to keep in mind what will be the most visible areas so as to avoid smaller broken patterns or tiles. Mistakes can be avoided before any tile is even set.

In a shower installation, layout is vital for a great looking project. If you look at this photo with the corner, transition band, straight and angled tile, you'll will see just how many things could go wrong without planning.


After I have done my planning on paper, I then take some measurements in the space that needs to be tiled and with a chalk line, I snap reference lines on the floor or wall. I can then do a sampling with the actual tile to see if the pattern I decided on was going to work out.

This phase of the project is where I spend a great deal of time because once I have started to actually lay the tile in thin set, it will be too late. It is also important to note that if using custom tile or varying sizes that the pattern be fully laid out dry to make sure that it fits and looks perfect. Also color variations in tile from varying lots can be spotted and moved to different places within the layout or taken out all together. Doing the entire project in a dry layout does take extra time, which of course relates to a higher cost, but a beautifully finished and matched end product are well worth it.


 Once I have dry laid the tile, checked the overall pattern and colors, made sure that all is good I can then start the process of applying the tile in thinset. You have surely heard carpenters saying, "Measure twice, cut once." The same applies to tile work.

Without proper planning and layout tile, a project such as below could have a totally different look.


Beautiful designs and layouts are not an accident. Careful planning and preparation are the keys to a successful project that you will enjoy for years to come.